Best MP3 Editor Software 2019
MP3 is a term that always comes up when there is a discussion of music or other listening materials such as podcasts or audio books. Its popularity is because of …
MP3 Editor for Free comes with dozens of audio effects, audio filters, and tools for converting audio files into formats including MP3, WMA, WAV, Ogg Vorbis, etc. You can load music CD tracks to edit them. Its powerful recorder would help you record any sound from your microphone or streaming audio on the Internet. The built-in audio CD burner is brainlessly easy to create your customized music CD and also, a CD ripper is prepared to copy the music CD back into your computer. Now you got everything you need to be a PRO!

MP3 Editor for Free can edit audio files over 50 formats at lightning speed, including MP3, WMA, WAV, AAC, FLAC, OGG, APE, AC3, AIFF, MP2, M4A, CDA, VOX, RA, RAM, TTA and many more. Any large audio files can be saved to the most popular audio formats as MP3, OGG, WMA, WAV, etc.

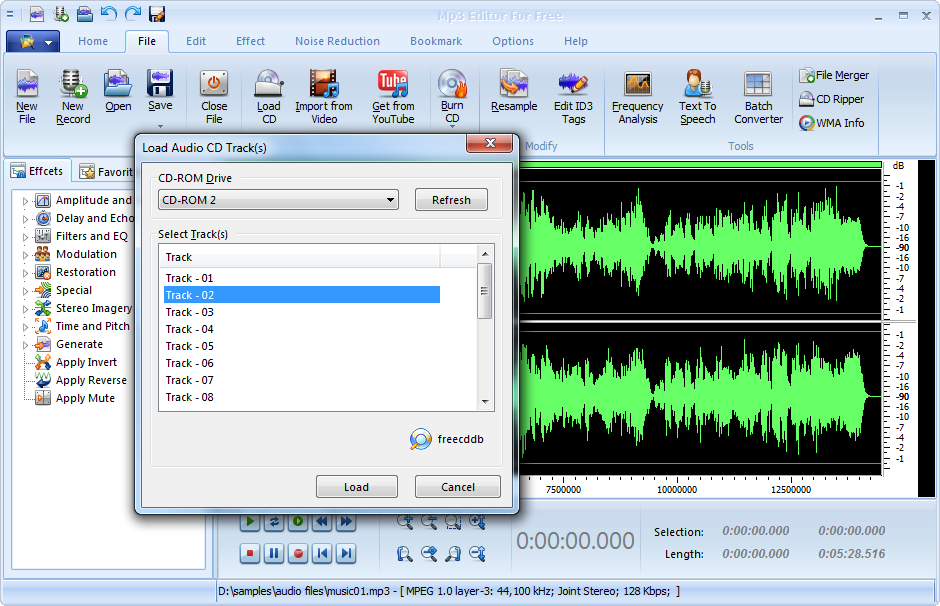
Apart from inputting audio files from local folder, this MP3 editor even allows digitally importing audio data from audio CD with most CD-ROM readers and creates multimedia sound tracks without hassle. In this way, you can edit live songs from the CD of the recording of a whole concert into individual tracks. There is also a free CDDB support to help search the online database for possible albums that matches (the artist, CD title, album, record label, track information, etc. could be retrieved and displayed).

It’s 100% free, safe and easy to use MP3 Editor for Free. It is guaranteed not to contain any spyware, viruses or any other kind of malware. The snappy interface enables you to find & use anything you want in just a few seconds. Even elementary users can perform all actions just by one mouse click. Just within 3 steps, you can get your own customized music!

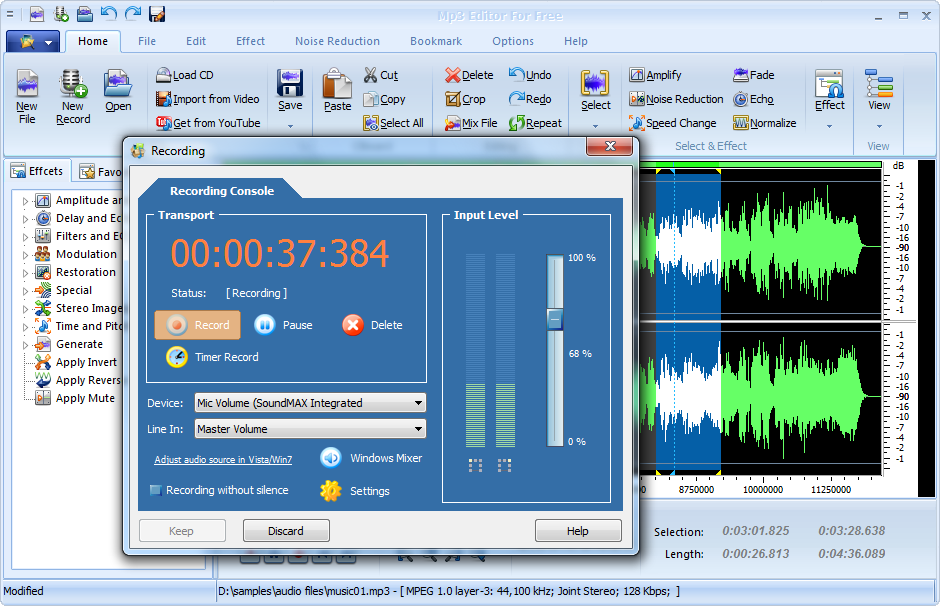
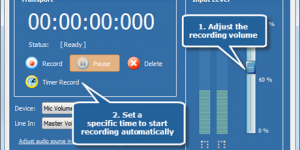
MP3 Editor for Free is equipped with an audio recorder to capture any sound you hear into your harddrive to create audio projects and gifts. You can record new audio file from both external and internal sources like Mic, cassette tapes, vinyl records, LPs, minidiscs, etc. with the original quality. The recorded audio file will automatically be input the waveform window.

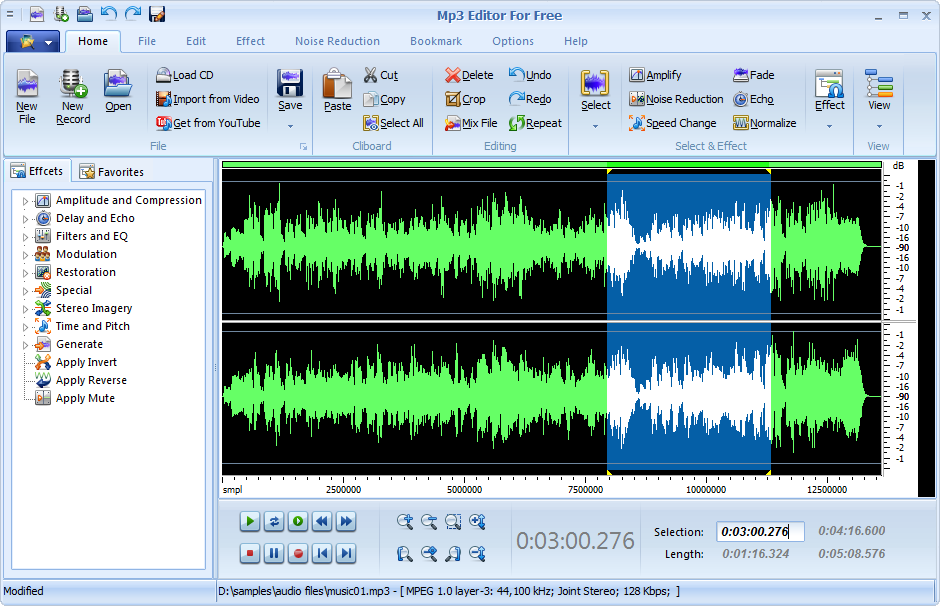
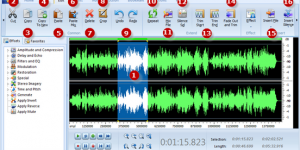
With MP3 Editor for Free, you can visually edit MP3 and other audio files faster and easier than ever before. On the visual waveform, you can perform the operations like cut, copy, paste, trim, delete and more to meet your needs. The zoom in & out are provided for better view. To view the signal more clearly, it allows you to zoom the selected region to make it displayed at the whole waveform window. What’s more, it features with zoomable waveform and selection tools of millisecond precision that enable you to easily pick the exact piece of the track you want to perform editing operations. No need to worry about mistakes made during editing because all operations can be restored with unlimited Undo & Redo functions.

Large quantities of effects and presets available for audio enhancement. It provides different effects(Amplify, Delay, Equalizer, Fade, Flanger, Invert, Normalize, Reverse, Multi Tab Delay, Silence, Stretch, Vibrato, Echo, Chorus) and filters to the selected part of an audio file(Ban Pass Filter, High Pass Filter, High Shelf Filter, Low Pass Filter, Low Shelf Filter, Notch Filter). What’s the best, it offers many amplitude presets and delay presets provided, saving you a lot of time to set the effects you need. You can preview each effect you added before with real-time previewer.

ID3 tag makes it possible to see the track names and info when you stick someone’s CD into your computer or enjoy music in your iPod. MP3 Editor for Free contains ID3 editor to help users insert songs’ title, artist, time, album name and more for convenient identification and management. Also, MP3 Editor for Free provides you WMA Info to help you change tagged information about your WMA music files. You can edit the Title, Artist, Album, Genre, Year, Frequency, Bitrate, Duration, etc. for the selected WMA files.

Mixing of different audio tracks is pretty usual to create your own music. With MP3 Editor for Free, you can handle it without reference manual. For professional audio production of songs, just mix music and the recorded vocal tracks; creating a mash up of your favorite tracks is always exciting; Audio presentations for broadcast interviews or commercials are much easier to make.

The inbuilt video to audio converter tool helps you extract theme music from home movies, YouTube videos, or any other video files with lossless quality. It enables you to convert video to audio formats from all popular input video formats like AVI, MP4, MPEG, FLV (Flash Video), 3GP, DAT, WMV, MOV, etc. The tool can also convert audio files of over 50 formats.

If you always wander on YouTube looking for some awesome music video, news, movie trailers, nut shots and stuff, MP3 Editor for Free is a good assistant as it provides you a YouTube tool. It allows you to download music videos, sports videos, new film trailers, funny videos and so on from YouTube.com for offline enjoyment with your family or friends. What’s more, you are allowed to convert downloaded YouTube music videos to various audio formats to enjoy on your MP3 player.

MP3 Editor for Free provides an audio CD burner tool that can create an audio CD from your recordings or any other audio files to use in many occasions like evening party, wedding ceremony, or during a car trip. In this way, you can make a special birthday mix CD to send to your friends or simply have a second copy of your favorite music.

To backup your CD collections it also provides an audio CD ripper to grab audio tracks from CDs and saving them to your hard drive or computer in a variety of digital formats including WMA, MP3, OGG, WAV and much more audio files. By using direct digital ripping, pure audio quality is maintained when you convert CD audio to MP3 or WAV. With the step by step wizard, one can use inbuilt Audio CD Grabber without any difficulties.
Picking out the right tool for audio editing job could be tricky. MP3 Editor for Free is actually a full-fledged audio package and is absolutely free. It provides almost everything you may need for the audio creation, editing, audio effects, CD burner and many pro tools for analysis.
![]()


MP3 is a term that always comes up when there is a discussion of music or other listening materials such as podcasts or audio books. Its popularity is because of …

The objective of this guide is to illustrate how to carry out basic editing on your MP3 files. To achieve this objective, we are going to employ a step by …

Music fade out is where sound level gradually becomes softer until it can no longer be heard. This technique can be applied to give the audio track of a video …
Currently, almost every information you need can be found on the internet. We have more people visiting websites for all kinds of information, thus the need for websites to not …
MP3 Editor for Free is a feature-rich audio editor that is able to record sound from any resource like movies, PC games, microphone, internet radio, webcasts, music, LPs, cassette tapes …
MP3 Editor for Free is multifunctional audio editing freeware. It’s completely charge-free and you can get a fully functional version through a free download without any fussy registration. With its …